Stepper motors are handy tools in various equipment because of their positional control property. This feature means the brushless motors can divide their complete rotation cycles into equal parts or steps. They use a cogged wheel and several electromagnets to spin the wheel step by step. One such motor is the 28BYJ-48. It is one of the cheapest and easiest to use steppers for learning about stepped rotation. We will look at the motor in detail, plus how to control it using the ULN2003 Driver and Arduino boards.
Contents
- What is the 28BYJ-48 Stepper Motor?
- 28BYJ-48 Stepper Motor Technical Specifications
- The ULN2003 Driver Board
- Control 28BYJ-48 Stepper Motor with ULN2003 Driver & Arduino
- Wiring
- Code
- Using AccelStepper Library
- Controlling Two 28-BYJ48 Stepper Motors
- What is the Difference Between Stepper Motors and Standard DC Motors?
- What is the Difference Between Stepper Motors and Servo Motors?
- When Would I Choose a Stepper Motor Over The Other Types
- Stepper Motor Applications
- Summary
What is the 28BYJ-48 Stepper Motor?
The 28BYJ-48 is a 4-phase, 5-wire unipolar stepper motor. Its task is to convert electrical signals into mechanical rotation discretely. The motor spins in precise, fixed increments at a step angle of 5.625° per increment when fed with an electrical pulse. Its stride angle is 5.625°/64 in the half-step mode, which means it takes 64 steps to complete one rotation.
360°/5.625° = 64
In full-step mode, the number reduces by half to 32.
The motor has four coils placed evenly around the rotor, and these form the static, stationary stator. Each has a +5V rating, making it easy to control using any 5V tolerant microcontroller, such as Arduino.
28BYJ-48 Stepper Motor Technical Specifications
- 5V DC rated voltage
- Four phases
- 300 gf. cm pull in torque
- 600VAC/1mA/1s insulated power
- 5.625°/64 stride angle
- Unipolar five lead coil
The ULN2003 Driver Board
28BYJ-48 motors consume a high amount of current, and therefore, they need a driver like the ULN2003 as an interface between them and Arduino. It consists of an array of seven Darlington transistor pairs where the second one amplifies the output of the first.
Each transistor can drive a load of up to 500mA and 50V.
If powering anything that consumes more than 80mA at 5V, use the driver board. However, when running a stepper motor of any size, always use the ULN2003 driver board. Why? The stepper can induce electrical noise in the power supply lines, and this noise can damage the Arduino microcontroller.
Special Offer: Get $100 off your order!
Email [email protected] to get started!
Control 28BYJ-48 Stepper Motor with ULN2003 Driver & Arduino
You need the following components:
- 28BYJ-48 stepper motor
- ULN2003 driver board
- Arduino UNO R3
- Male to female jumper wires
- 5V power supply (adapter)
- USB cable
- Arduino IDE
Wiring
Make these connections between Arduino and the driver.

The Arduino UNO, ULN2003, stepper motor circuit diagram
Also, hook up the 5V adapter to the driver board and microcontroller, as shown in the circuit diagram above.
Code
After setting up, open the Arduino IDE and use the Arduino stepper library to handle the stepping sequence. The control library comes packaged with the IDE and makes it easy to control unipolar & bipolar stepper motors.
Write the following code and upload it to the Arduino board to turn the motor slowly clockwise then counterclockwise.
Explanation
The first line includes the Arduino stepper library. After it, we define a constant to specify the number of steps the motor will take to complete one revolution.
Next, create an object of the stepper class to match the step sequence IN1, IN3, IN2, IN4 (pin sequence 8, 10, 9, 11). You can create multiple objects to control several motors simultaneously but remember to follow the correct step sequence.
The library sets the four I/O pins as outputs internally, so there is no need to put any code in the setup function. Lastly, the loop function spins the motor clockwise and counterclockwise continuously. It sets the speed, the number of steps, and the delay before switching rotation. Passing a negative parameter to the step function turns the spinning direction.
Using AccelStepper Library
While you can use the stepper library to control multiple motors, the AccelStepper library is better for this job. Additionally, it supports half-step driving, acceleration & deceleration, and independent, concurrent stepping on each stepper.
However, you must install the library first because it is not a part of the IDE. Go to Sketch > Include library > Manage libraries. Search the AccelStepper library and install it.
After this, write the following code on the IDE and upload it to Arduino.
Explanation
Begin by including the library, then define the constant for the half-step method or the full-step method (eight and four, respectively). Next, create a stepper object/ instance of the library and set the pin sequence to 8, 10, 9, 11.
After that, set the maximum speed to 1,000 and an acceleration factor of 50 to include acceleration and deceleration movements. Next, limit the regular rate to 200 and the steps per rotation to 2038.
The loop function rounds up the code, and it changes the spinning direction by reading the distance to go property until it gets to the 2038 steps. Once the direction changes, the if function checks the same and switches the spinning after the negative 2038 steps. The run function is crucial because it instructs the driver to run the stepper.
Controlling Two 28-BYJ48 Stepper Motors
The wiring for the first stepper will not change. But you will need an extra driver and jumper wires to link the motor to Arduino and the 5V power adapter.
The Arduino UNO, two ULN2003, two stepper motor circuit diagram
Connect the two as follows.
Still using the AccelStepper library, you can use the following code to drive one motor at half steps and the other at full stages.
After including the library, define the full-step and half-step constants, then create the two stepper motor objects. Remember to use the correct pin sequence, as explained earlier.
The setup function is for setting the maximum speed, acceleration, regular speed, and the number of steps per rotation for each stepper.
Conclude with the loop function to keep the motors running, then switch their spinning direction after moving 2038 steps in their respective directions.
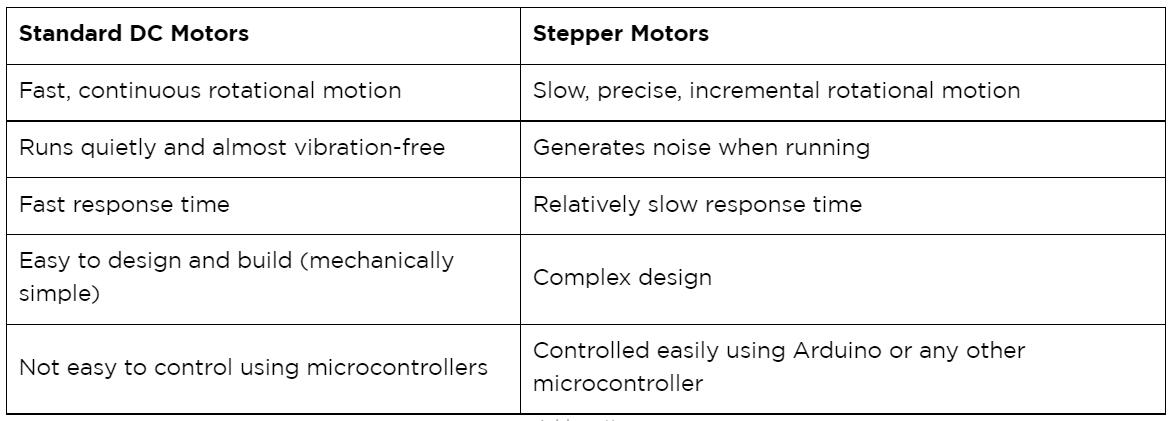
What is the Difference Between Stepper Motors and Standard DC Motors?
If unsure about which motor to use for your project, here is a detailed comparison between standard DC motors and stepper motors.
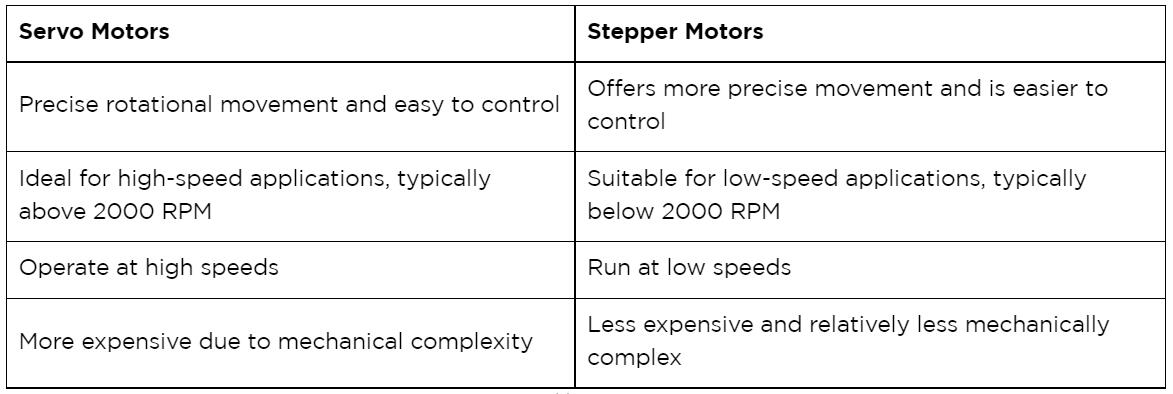
What is the Difference Between Stepper Motors and Servo Motors?
Here's how the stepper motor stacks up against the servo motor.
When Would I Choose a Stepper Motor Over The Other Types
A 28BYJ-48 stepper motor has these advantages over standard DC and servo motors.
- Precise positioning: One of the best advantages of stepper motors is their precise positioning because they rotate in steps.
- Accurate speed control: The controlled stepped movement gives precise speed control, making the motor ideal for robotics, automation of processes, etc.
- High torque at slow speeds: The motor is perfect for slow speeds (less than 2000 RPM) because it has high torque at these levels
- Easy to control: Stepper motor control using Arduino or any other microcontroller is relatively easy, which is one of the primary reasons for their continued usage
- Affordable: These motors are less expensive and can help you realize better cost savings in your project
- Widely Available: Like DC motors, this type is widely available and comes in multiple styles & sizes
Stepper Motor Applications
- CNC milling machines
- Precise control machines
- DVD players
- 3D printers
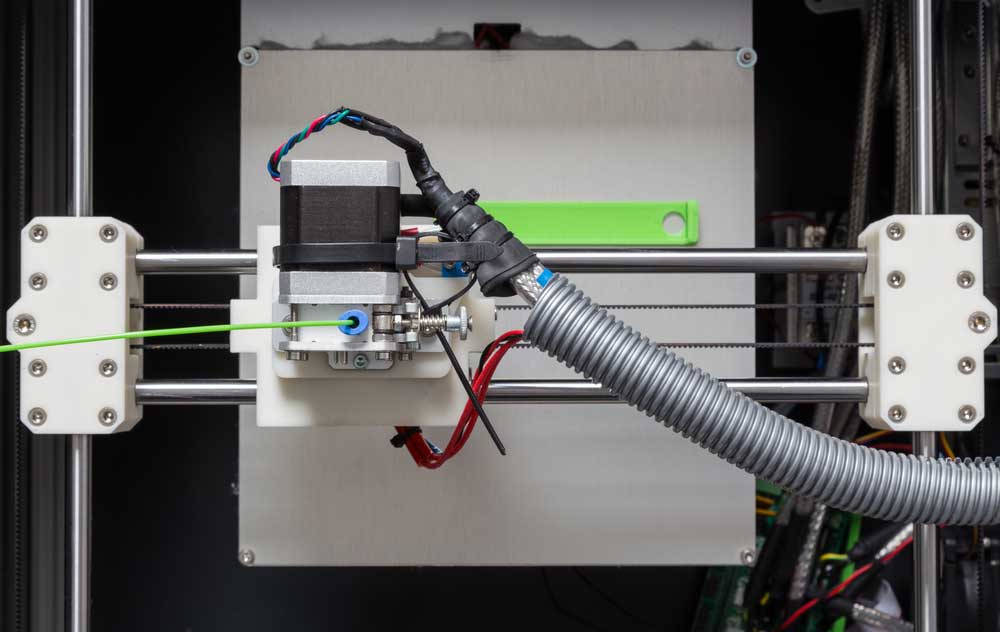
A 3D printer with a stepper motor
- Car side-view mirror tilt
- Security cameras
- Vending machines
- Desktop printers
Summary
In conclusion, the 28BYJ-48 stepper motor is one of the cheapest stepper motors and has numerous applications in vehicles, electrical appliances, and several machines. You can control it using Arduino (as explained in detail earlier), and if you encounter any difficulties, reach out for further clarification.
Special Offer: Get $100 off your order!
Email [email protected] to get started!


